


Create Separate Contact Page in Blogger

Blogger launched it’s official version of the Contact Form Widget but, it works only on the Blogger Sidebar. If you don’t want to add the contact form to your Blog’s sidebar but want it to appear on a specific page, then this tutorial will help you out. I didn’t want the contact form to appear every where on my blog. So I have moved it to a separate Contact Me Page.
How to move the Blogger Contact Form to a separate Page
Follow the below steps to move the Contact Form to a separate page. If you would like to see a demo, you can check out my Contact page.
- First, add the Blogger Contact Form Widget to your sidebar. (We will hide the contact form later in this tutorial, but you have to add it) . My previous tutorial on adding a blogger contact form widget will help you out.
- Now create a new page in your blog

Copy the below contact form code block
<div class="widget ContactForm" id="ContactForm1">
<div class="contact-form-widget">
<div class="form">
<form name="contact-form">
<div>
Your Name : </div>
<input class="contact-form-name" id="ContactForm1_contact-form-name" name="name" size="30" type="text" value="" />
<div>
Your Email: <i>(required)</i></div>
<input class="contact-form-email" id="ContactForm1_contact-form-email" name="email" size="30" type="text" value="" />
<div>
Your Message: <i>(required)</i></div>
<textarea class="contact-form-email-message" id="ContactForm1_contact-form-email-message" name="email-message" rows="5"></textarea> <input class="contact-form-button contact-form-button-submit" id="ContactForm1_contact-form-submit" type="button" value="Send" />
<div style="max-width: 450px; text-align: center; width: 100%;">
</div>
</form>
</div>
</div>
</div>
</div>
</div>
While creating the Page, you have to switch to the HTML mode as shown in the image below. Then paste the above code into the post editor, disable the comments and publish your page.

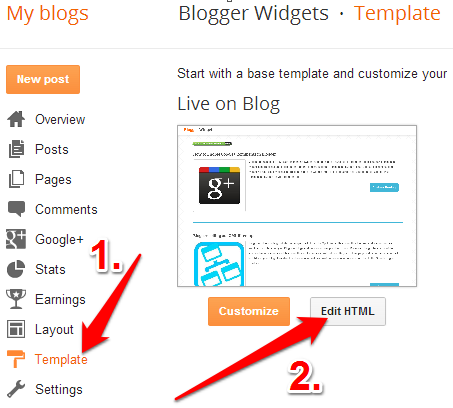
Now go to Template > Edit HTML
and Jump to the Contact Form Code and expand with widget code


and then expand the main b : includable

Now delete the code highlighted below

so that it ends up like

And Add CSS coding
Past coding
 .contact-form-widget {
 width: 500px;
 max-width: 100%;
 margin: 0 auto;
 padding: 10px;
 background: #F8F8F8;
 color: #000;
 font-family: Goudy Old Style;
 font-size:18px;
 border: 1px solid #C1C1C1;
 box-shadow: 0 1px 4px rgba(0, 0, 0, 0.25);
 border-radius: 10px;
 }
 /* Fields and submit button */
 .contact-form-name {
 background: white;
 border: 1px solid #DDD;
 border-radius: 5px;
 box-shadow: 0 0 5px #DDD inset;
 color: #666;
 outline: none;
 height:25px;
 width: 300px;
 }
 .contact-form-name:hover{
 background: white;
 border: 1px solid #ffa853;
 border-radius: 5px;
 box-shadow: 0 0 5px 3px #ffa853;
 color: #000;
 outline: none;
 }
 .contact-form-name:focus{
 outline: none;
 border: 1px solid #7bc1f7;
 box-shadow: 0px 0px 8px #7bc1f7;
 -moz-box-shadow: 0px 0px 8px #7bc1f7;
 -webkit-box-shadow: 0px 0px 8px #7bc1f7;
 }
 .contact-form-email {
 background: white;
 border: 1px solid #DDD;
 border-radius: 5px;
 box-shadow: 0 0 5px #DDD inset;
 color: #666;
 outline: none;
 height:25px;
 width: 300px;
 }
 .contact-form-email:hover {
 background: white;
 border: 1px solid #ffa853;
 border-radius: 5px;
 box-shadow: 0 0 5px 3px #ffa853;
 color: #000;
 outline: none;
 }
 .contact-form-email:Focus{
 outline: none;
 border: 1px solid #7bc1f7;
 box-shadow: 0px 0px 8px #7bc1f7;
 -moz-box-shadow: 0px 0px 8px #7bc1f7;
 -webkit-box-shadow: 0px 0px 8px #7bc1f7;
 }
 .contact-form-email-message {
 width: 100%;
 max-width: 100%;
 margin-bottom: 10px;
 background: white;
 border: 1px solid #DDD;
 border-radius: 5px;
 box-shadow: 0 0 5px #DDD inset;
 color: #666;
 outline: none;
 }
 .contact-form-email-message:hover {
 background: white;
 border: 1px solid #ffa853;
 border-radius: 5px;
 box-shadow: 0 0 5px 3px #ffa853;
 color: #000;
 outline: none;
 }
 .contact-form-email-message:focus {
 outline: none;
 border: 1px solid #7bc1f7;
 box-shadow: 0px 0px 8px #7bc1f7;
 -moz-box-shadow: 0px 0px 8px #7bc1f7;
 -webkit-box-shadow: 0px 0px 8px #7bc1f7;
 }
 /* Submit button style */
 .contact-form-button-submit {
 border-color: #C1C1C1;
 background: #E3E3E3;
 color: #585858;
 width: 20%;
 max-width: 20%;
 margin-bottom: 10px;
 }
 /* Submit button on mouseover */
 .contact-form-button-submit:hover{
 background: #4C8EF9;
 color: #ffffff;
 border: 1px solid #FAFAFA;
 }
- Now we have prevented the Contact Form Widget from appearing anywhere on the sidebar but have kept the widget registered.Make sure that you don't remove the widget from the Layout Page.
- Save the Template and it’s done.You now have a separate contact page on your Blogger blog.
- Happy Blogging!
SHARE THIS POST


0 comments :