Latest Post

C++ | Multiplication of Matrices using 2d Arrays


Introduction
 

This program is to multiply two matrices. The program below is given. The program is extendable. Look at the extending it section in this post. Go enjoy the program.

Program to multiply two matrices :


 #include<iostream.h>  
 #include<conio.h>  
 void main()  
 {  
 //clear the screen.  
 clrscr();  
 //declare variable type int  
 int a[3][3],b[3][3],i,j,k,s;  
 //Input the numbers of first matix  
 cout<<"First Matrix"<<endl;  
 for(i=0;i<3;i++)  
 {  
 for(j=0;j<3;j++)  
 {  
 cout<<"Enter number :";  
 cin>>a[i][j];  
 }  
 }  
 //Input the numbers of second matix  
 cout<<"Second Matrix"<<endl;  
 for(i=0;i<3;i++)  
 {  
 for(j=0;j<3;j++)  
 {  
 cout<<"Enter number :";  
 cin>>b[i][j];  
 }  
 }  
 //display the multipication of matrices  
 cout<<"Multiplication is"<<endl;  
 for(i=0;i<3;i++)  
 {  
 for(j=0;j<3;j++)  
 {  
 for(k=0;k<3;k++)  
 s=s+a[i][k]*b[k][j];  
 cout<<s<<"/t";  
 s=0;  
 }  
 cout<<endl;  
 }  
 //get character  
 getch();  
 }  

Output :

First Matrix

Enter the number
1
Enter the number
1
Enter the number
1
Enter the number
1
Enter the number
1
Enter the number
1
Enter the number
1
Enter the number
1
Enter the number
1

Second Matrix

Enter the number
1
Enter the number
1
Enter the number
1
Enter the number
1
Enter the number
1
Enter the number
1
Enter the number
1
Enter the number
1
Enter the number
1

Multiplication is
3 3 3
3 3 3
3 3 3

How does it work
  1. You enter the number.
  2. The number is saved in respective array for first matrix.
  3. The number is saved in respective array for second matrix.
  4. Then numbers are multiplied and printed to form of matrix.
Extending it

The program can be extended by using more numbers and making the matrix more bigger. Go extend it.

Explanation.
  1. Include ‘iostream.h’ and ‘conio.h’ files.
  2. Add void main.
  3. Start program by first clearing the screen.
  4. Declare the variables as int (name them as you want.)
  5. Add the cout and cin of array.
  6. Add for loop to print the multiplication of matrices.
At the end

You learn creating the C++ program of Multiplication of matrices using 2d array. So now enjoy the program.

Please comment on the post and share it.
And like it if you liked.

SHARE THIS POST

Author: Robin Saxena
I m computer science student and i Interested in cs, c/c++ programming, java, html ,Photography , Music , and generally connecting with others.

0 comments :

C++ | hello world


First C++ program, hello world


The hello world program is one of the simplest programs, but it already contains the fundamental components that every C++ program has. Don’t be overwhelmed, we will take a look at the code line by line.

Type the code in your favorite editor (always type, don’t use cut/paste. This is better for learning purposes).

Save the program with the name: hello.cpp.

Program of Hello World 

1:   #include<iostream.h>   
2:   #include<conio.h>   
3:   void main()   
4:   {   
5:   //clear the screen.   
6:   clrscr();  
7:  cout<<"hello world ";  
8:  getch();  
9:  }  

// A hello world program in C++

The first line in our program is a comment line. Every line that starts with two slash signs ( // ) are considered comments and will have no effect on the behavior or outcome of the program. (Words between /* and */ will also be considered as comments (old style comments)). Use comments in your programs to explain difficult sections, but don’t overdo it. It is also common practice to start every program with a brief description on what the program will do.

#include

Lines beginning with a pound sign (#) are used by the compilers pre-processor. In this case the directive #include tells the pre-processor to include the iostream standard file. This file iostream includes the declarations of the basic standard input/output library in C++. (See it as including extra lines of code that add functionality to your program).

using namespace std;

All the elements of the standard C++ library are declared within what is called a namespace. In this case the namespace with the name std. We put this line in to declare that we will make use of the functionality offered in the namespace std. This line of code is used very frequent in C++ programs that use the standard library. You will see that we will make use of it in most of the source code included in these tutorials.

int main()

int is what is called the return value (in this case of the type integer. Integer is a whole number). What is used for will be explained further down.
Every program must have a main() function. The main function is the point where all C++ programs start their execution. The word main is followed by a pair of round brackets. That is because it is a function declaration (Functions will be explained in more detail in a later tutorial). It is possible to enclose a list of parameters within the round brackets.

{}

The two curly brackets (one in the beginning and one at the end) are used to indicate the beginning and the end of the function main. (Also called the body of a function). Everything contained within these curly brackets is what the function does when it is called and executed. In the coming tutorials you will see that many other statements make use of curly brackets.

cout << “Hello World”;

This line is a C++ statement. A statement is a simple expression that can produce an effect. In this case the statement will print something to our screen.
cout represents the standard output stream in C++.
(There is also a standard input stream that will be explained in another tutorial). In this a sequence of characters (Hello World) will be send to the standard output stream (in most cases this will be your screen).
The words Hello World have to be between ” “, but the ” ” will not be printed on the screen. They indicate that the sentence begins and where it will end.
cout is declared in the iostream standard file within the std namespace. This is the reason why we needed to include that specific file. This is also the reason why we had to declare this specific namespace.
As you can see the statement ends with a semicolon (;). The semicolon is used to mark the end of the statement. The semicolon must be placed behind all statements in C++ programs. So, remember this. One of the common errors is to forget to include a semicolon after a statement.

Indentations

As you can see the cout and the return statement have been indented or moved to the right side. This is done to make the code more readable. In a program as Hello World, it seems a stupid thing to do. But as the programs become more complex, you will see that it makes the code more readable. (Also you will make fewer errors, like forgetting a curly bracket on the end of a function).
So, always use indentations and comments to make the code more readable. It will make your life (programming life at least) much easier if the code becomes more complex.

Please comment on the post and share it.
And like it if you liked.

SHARE THIS POST

Author: Robin Saxena
I m computer science student and i Interested in cs, c/c++ programming, java, html ,Photography , Music , and generally connecting with others.

0 comments :

C++ | Sum of Matrices using 2d Array


Introduction


This program is of sum of matrices using 2d arrays. The program below is given. The program is extendable by using more numbers for matrix.

Program of sum of matrices


1:  #include<iostream.h>  
2:  #include<conio.h>  
3:  void main()  
4:  {  
5:  //clear the screen.  
6:  clrscr();  
7:  //declare variable type int  
8:  int a[3][3],b[3][3],i,j;  
9:  //Input <span class="IL_AD" id="IL_AD5">the numbers</span> <span class="IL_AD" id="IL_AD8">of first</span> matix  
10:  cout<<"First Matrix"<<endl;  
11:  for(i=0;i<3;i++)  
12:  {  
13:  for(j=0;j<3;j++)  
14:  {  
15:  cout<<"Enter number :";  
16:  cin>>a[i][j];  
17:  }  
18:  }  
19:  //Input the numbers of <span class="IL_AD" id="IL_AD6">second</span> matix  
20:  cout<<"Second Matrix"<<endl;  
21:  for(i=0;i<3;i++)  
22:  {  
23:  for(j=0;j<3;j++)  
24:  {  
25:  cout<<"Enter number :";  
26:  cin>>b[i][j];  
27:  }  
28:  }  
29:  //display the sum of matrices  
30:  cout<<"Sum is"<<endl;  
31:  for(i=0;i<3;i++)  
32:  {  
33:  cout<<"\n";  
34:  for(j=0;j<3;j++)  
35:  {  
36:  cout<<a[i][j]+b[i][j]<<"t";  
37:  }  
38:  cout<<endl;  
39:  }  
40:  //get character  
41:  getch();  
42:  }  

Output :

First Matrix
Enter the number
1
Enter the number
2
Enter the number
3
Enter the number
4
Enter the number
5
Enter the number
6
Enter the number
7
Enter the number
8
Enter the number
9

Second Matrix
Enter the number
1
Enter the number
2
Enter the number
3
Enter the number
4
Enter the number
5
Enter the number
6
Enter the number
7
Enter the number
8
Enter the number
9

Sum is
2 4 6
8 10 12
14 16 18

How does it work
  1. You enter the number.
  2. The number is saved in respective array for first matrix.
  3. The number is saved in respective array for second matrix.
  4. Then numbers are added and printed to form of matrix.
Extending it

The program can be extended by using more numbers and making the matrix more bigger. You can also do the same program to subtract the matrices. Go ahead. Extend it.

Explanation.
  1. Include ‘iostream.h’ and ‘conio.h’ files.
  2. Add void main.
  3. Start program by first clearing the screen.
  4. Declare the variables as int (name them as you want.)
  5. Add the cout and cin of array.
  6. Add for loop to print the sum of matrices.
At the end

You learnt creating the C++ program of Sum of matrices using 2d array. So now enjoy the program.

Please comment on the post and share it.
And like it if you liked.

SHARE THIS POST

Author: Robin Saxena
I m computer science student and i Interested in cs, c/c++ programming, java, html ,Photography , Music , and generally connecting with others.

1 comments :

Download Full screen Turbo C++ For Windows 7 / windows 8 32bit / 64bit working tested

Turbo C is an Integrated Development Environment and compiler for the C programming language from Borland. First introduced in 1987, it was noted for its integrated development environment, small size, fast compile speed, comprehensive manuals and low price. In May 1990, Bore-land replaced Turbo C with Turbo C++. In 2006, Bore-land reintroduced the Turbo moniker.


 Here we are with a Turbo C++ For Windows 8   and fully working Turbo C++ compiler for Windows 7 and Windows 8 .It is a one click installation setup which enables you to use Turbo C++ on Windows 7 in full screen mode. The setup package which we are providing here is a simple  Turbo C++ For Windows 7 setup which is ready to run on Windows 8 32 and 64 bit.  

Important: This version is both working on Windows 7 and windows 8 in both bit [ 32 bit and 64 bit ] Full screen mode tested.

 File Size:           6.83 MB  
 License:           Freeware  
 Price:           FREE  


Go to This link for Download and enjoy programming : Click Here     [Link Updated.]

SHARE THIS POST

Author: Robin Saxena
I m computer science student and i Interested in cs, c/c++ programming, java, html ,Photography , Music , and generally connecting with others.

0 comments :

Create Separate Contact Page in Blogger


Blogger launched it’s official version of the Contact Form Widget but, it works only on the Blogger Sidebar. If you don’t want to add the contact form to your Blog’s sidebar but want it to appear on a specific page, then this tutorial will help you out. I didn’t want the contact form to appear every where on my blog. So I have moved it to a separate Contact Me Page.

How to move the Blogger Contact Form to a separate Page


Follow the below steps to move the Contact Form to a separate page. If you would like to see a demo, you can check out my Contact page.
  1. First, add the Blogger Contact Form Widget to your sidebar. (We will hide the contact form later in this tutorial, but you have to add it) . My previous tutorial on adding a blogger contact form widget will help you out.
  2. Now create a new page in your blog

Copy the below contact form code block
 <div class="widget ContactForm" id="ContactForm1">  
 <div class="contact-form-widget">  
 <div class="form">  
 <form name="contact-form">  
 <div>  
 Your Name : </div>  
 <input class="contact-form-name" id="ContactForm1_contact-form-name" name="name" size="30" type="text" value="" />&nbsp;   
 <div>  
 Your Email: <i>(required)</i></div>  
 <input class="contact-form-email" id="ContactForm1_contact-form-email" name="email" size="30" type="text" value="" />&nbsp;   
 <div>  
 Your Message: <i>(required)</i></div>  
 <textarea class="contact-form-email-message" id="ContactForm1_contact-form-email-message" name="email-message" rows="5"></textarea>&nbsp; <input class="contact-form-button contact-form-button-submit" id="ContactForm1_contact-form-submit" type="button" value="Send" />   
 <div style="max-width: 450px; text-align: center; width: 100%;">  
 </div>  
 </form>  
 </div>  
 </div>  
 </div>  
 </div>  
 </div>  

While creating the Page, you have to switch to the HTML mode as shown in the image below. Then paste the above code into the post editor, disable the comments and publish your page.


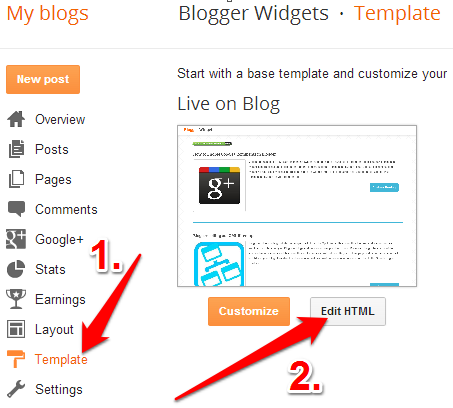
Now go to Template > Edit HTML

 
and Jump to the Contact Form Code and expand with widget code


and then expand the main b : includable


Now delete the code highlighted below


so that it ends up like


 And Add CSS coding

Past coding

 .contact-form-widget {  
 width: 500px;  
 max-width: 100%;  
 margin: 0 auto;  
 padding: 10px;  
 background: #F8F8F8;  
 color: #000;  
 font-family: Goudy Old Style;  
 font-size:18px;  
 border: 1px solid #C1C1C1;  
 box-shadow: 0 1px 4px rgba(0, 0, 0, 0.25);  
 border-radius: 10px;  
 }  
 /* Fields and submit button */  
 .contact-form-name {  
 background: white;  
 border: 1px solid #DDD;  
 border-radius: 5px;  
 box-shadow: 0 0 5px #DDD inset;  
 color: #666;  
 outline: none;  
 height:25px;  
 width: 300px;  
 }  
 .contact-form-name:hover{  
 background: white;  
 border: 1px solid #ffa853;  
 border-radius: 5px;  
 box-shadow: 0 0 5px 3px #ffa853;  
 color: #000;  
 outline: none;  
 }  
 .contact-form-name:focus{  
 outline: none;  
 border: 1px solid #7bc1f7;  
 box-shadow: 0px 0px 8px #7bc1f7;  
 -moz-box-shadow: 0px 0px 8px #7bc1f7;  
 -webkit-box-shadow: 0px 0px 8px #7bc1f7;  
 }  
 .contact-form-email {  
 background: white;  
 border: 1px solid #DDD;  
 border-radius: 5px;  
 box-shadow: 0 0 5px #DDD inset;  
 color: #666;  
 outline: none;  
 height:25px;  
 width: 300px;  
 }  
 .contact-form-email:hover {  
 background: white;  
 border: 1px solid #ffa853;  
 border-radius: 5px;  
 box-shadow: 0 0 5px 3px #ffa853;  
 color: #000;  
 outline: none;  
 }  
 .contact-form-email:Focus{  
 outline: none;  
 border: 1px solid #7bc1f7;  
 box-shadow: 0px 0px 8px #7bc1f7;  
 -moz-box-shadow: 0px 0px 8px #7bc1f7;  
 -webkit-box-shadow: 0px 0px 8px #7bc1f7;  
 }  
 .contact-form-email-message {  
 width: 100%;  
 max-width: 100%;  
 margin-bottom: 10px;  
 background: white;  
 border: 1px solid #DDD;  
 border-radius: 5px;  
 box-shadow: 0 0 5px #DDD inset;  
 color: #666;  
 outline: none;  
 }  
 .contact-form-email-message:hover {  
 background: white;  
 border: 1px solid #ffa853;  
 border-radius: 5px;  
 box-shadow: 0 0 5px 3px #ffa853;  
 color: #000;  
 outline: none;  
 }  
 .contact-form-email-message:focus {  
 outline: none;  
 border: 1px solid #7bc1f7;  
 box-shadow: 0px 0px 8px #7bc1f7;  
 -moz-box-shadow: 0px 0px 8px #7bc1f7;  
 -webkit-box-shadow: 0px 0px 8px #7bc1f7;  
 }  
 /* Submit button style */  
 .contact-form-button-submit {  
 border-color: #C1C1C1;  
 background: #E3E3E3;  
 color: #585858;  
 width: 20%;  
 max-width: 20%;  
 margin-bottom: 10px;  
 }  
 /* Submit button on mouseover */  
 .contact-form-button-submit:hover{  
 background: #4C8EF9;  
 color: #ffffff;  
 border: 1px solid #FAFAFA;  
 }  
  1. Now we have prevented the Contact Form Widget from appearing anywhere on the sidebar but have kept the widget registered.Make sure that you don't remove the widget from the Layout Page.
  2. Save the Template and it’s done.You now have a separate contact page on your Blogger blog.
  3.  
     Happy Blogging!

SHARE THIS POST

Author: Robin Saxena
I m computer science student and i Interested in cs, c/c++ programming, java, html ,Photography , Music , and generally connecting with others.

0 comments :

how to add data | month| year and day in blogger


Live Demo


How to Add add data | month| year and day in blogger

Go to Blogger >> template

Step 1  Copy the following code and paste inside an Template (script)

  
 <div id='mydate'>  
       <script type='text/javascript'>  
        /*<![CDATA[*/  
        var mydate=new Date()  
        var year=mydate.getYear()  
        if (year < 1000)  
         year+=1900  
         var day=mydate.getDay()  
         var month=mydate.getMonth()  
         var daym=mydate.getDate()  
         if (daym<10)  
          daym="0"+daym  
          var dayarray=new Array("Sunday","Monday","Tuesday","Wednesday","Thursday","Friday","Saturday")  
          var montharray=new Array("January","February","March","April","May","June","July","August","September","October","November","December")  
          document.write(""+dayarray[day]+", "+montharray[month]+" "+daym+", "+year+"")  
          /*]]>*/  
       </script>  

Step 2 Copy the following code and paste inside an Template (CSS)

 #mydate {  
     color: #ffffff;  
     display: inline-block;  
     float: right;  
     font-size: 14px;  
     padding: 4px 10px;  
     font-family: 'Bree Serif', serif;  
 }  
 #mydate a {  
      background: none repeat scroll 0 0 #333333;  
      color: #ffffff;  
      font-family: sans-serif;  
      font-weight: bolder;  
      padding: 13px 16px 16px;  
 }  

Step 3 Check blog

SHARE THIS POST

Author: Robin Saxena
I m computer science student and i Interested in cs, c/c++ programming, java, html ,Photography , Music , and generally connecting with others.

0 comments :

How To Remove Showing Posts With Label Show All Posts

Getting rid of the message "showing posts with a specific label" above your blog title why you choose on a particular label will help you get your blog to look more professional and less of blog like features. When it comes to proper blog navigation, blog labels can never be overlooked as it helps your blog readers to navigate easily to different sections of your webpage. Personally i hate to see this message while navigating on my blog or others blog, so if you hate to see the message like me, don't worry as this tutorial will walk you through the steps you need to take to get rid of this message. Check out the image below to have an idea of how the said message looks like.

 How To Remove Showing Posts With Label Show All Posts

The Tutorial Proper: How To Remove Showing Posts With Label . Show All Posts
Log in to your blog dashboard => Backup your blogger template, in case you make any mistake in the process.

Go to templates and click on Edit HTML.

Click anywhere inside the template editor and press Ctrl+F and find the code below.

  <b:includable id='status-message'>  

Copy and past the code above in the search bar and press enter on your keyboard to locate it.

How To Remove Showing Posts With Label . Show All Posts

Now, after locating the code, click on the arrow in on the left side of the code as seen in the image below.
How To Remove Showing Posts With Label . Show All Posts

Now after clicking on the arrow, you will see a code like the one below.

                How To Remove Showing Posts With Label . Show All Posts

Replace all of these codes above with the one below.
 <b:includable id='status-message'>  
 <b:if cond='data:navMessage'><div>  
 </div>  
 <div style='clear: both;'/>  
 </b:if>  
 </b:includable>  

Now save your template and reload your blog to see the changes.


That was all about "How To Remove Showing Posts With Label . Show All Posts". I hope you did it successfully? please share your your thoughts and ideas with us via the comment section

SHARE THIS POST

Author: Robin Saxena
I m computer science student and i Interested in cs, c/c++ programming, java, html ,Photography , Music , and generally connecting with others.

1 comments :

Auto Scrolling Recent Posts Widget for Blogger/Blogspot


If you have a lot of post on the blog, or if you want to show everyone your list of favorite books, but have little space in the sidebar widget this will be a great help to you. This post explains how to add auto scrolling (marquee) recent posts Widget on his blog that looks good on your blogspot blog. This is similar to the display of recent post in your sidebar, but this will have a marquee in this widget. Now if you want to show your blog in this way, either on top or bottom of your blog, then you can use this new widget:


How to Install Auto Scrolling Recent Posts Widget

Adding The Widget To Blogger

Go to Blogger >> template

Step 1  Copy the following code and paste inside an Template (script)

 <div class='head_brnews'>  
  <div class='breaking-news'>   
   <div class='samazhlo'>  
    Latest Post  
   </div>  
   <script src='https://dl.dropboxusercontent.com/u/80436322/autoscroll.js' type='text/javascript'/>  
   <script type='text/javascript'>  
    var nMaxPosts =8;  
    var nWidth = 100;  
    var nScrollDelay = 120;  
    var sDirection = &quot;left&quot;;  
    var sOpenLinkLocation = &quot;N&quot;;  
    var sBulletChar = &quot;&gt;&gt;&quot;;  
   </script>  
   <script src='/feeds/posts/default?alt=json-in-script&amp;callback=RecentPostsScrollerv2&amp;max-results=6' type='text/javascript'/>  
  </div>  
   </div>  

Step 2 Copy the following code and paste inside an Template (CSS)

 .head_brnews{  
       height:30px;  
       background:#fff;  
       width:100%;  
       max-width:1160px;  
       margin:15px auto;  
       border-style: solid ;  
       border-width: 1px;  
       border-color: #0080ff;  
       overflow: hidden;  
       width: 955px;  
       margin-top:15px;  
 }  
 .breaking-news{  
        float:left;  
        height:30px;  
        position:relative;  
        overflow:hidden;  
        margin-bottom:20px;  
 }  
 .breaking-news {  
         background: #fff;  
         display:block;  
         float:left;  
         padding:0 10px;  
         height:32px;  
         line-height:30px;  
         color:#000;  
         font-family: Oswald,arial,Georgia,serif;  
         text-transform:uppercase;  
         font-size:15px;  
         margin-right:10px  
 }  
 .breaking-news ul{  
          float:left  
 }  
 .breaking-news a:hover{  
            color:#333;  
 }  
 .breaking-news ul li{  
           float:left;  
           display:block;  
           list-style:none;  
 }  
 .breaking-news ul a{  
           padding:1px;  
           display:block;  
           color:#333;  
           white-space:nowrap;  
           float:left;  
           line-height:30px;  
           font-size:15px;  
           font-family: 'Droid Serif', serif;  
           display:hidden;  
 }  
 .breaking-news span{  
          display:block;  
          float:left;  
          padding:1px 10px;  
          color:#333;  
          font-size:15px;  
          line-height:30px;  
 }  
 .samazhlo{  
      background:#4371CF;  
      position:absolute;  
      left:0;  
      padding: 0 20px;  
      height: 32px;  
      line-height: 30px;  
      color: #FFF;  
      font-family: 'Yanone Kaffeesatz', sans-serif;  
      text-transform: uppercase;  
      font-size: 20px;  
      margin-right: 10px;  
 }  

SHARE THIS POST

Author: Robin Saxena
I m computer science student and i Interested in cs, c/c++ programming, java, html ,Photography , Music , and generally connecting with others.

1 comments :

HTML (HyperText Markup Language)


Developed by Tim Berners-Lee in 1990, HTML is short for HyperText Markup Language and is a language used to create electronic documents, especially pages on the World Wide Web that contain connections called hyperlinks to other pages. Every web page you see on the Internet, including this one contains HTML code that helps format and show text and images in an easy to read format. Without HTML a browser would not know how to format a page and would only display plain text with no formatting that contained no links. Below is an example of a basic web page in HTML code.

 <!DOCType HTML PUBLIC "-//W3C//DTD HTML 4.01 Transitional//EN" "http://www.w3.org/TR/html4/loose.dtd">  
 <html lang="en"><head>  
 <title>Example page</title>  
 <meta http-equiv="Content-Type" content="text/html; charset=windows-1252">  
 </head>  
 <body>  
 <h1>This is a heading</h1>  
 <p>This is an example of a basic HTML page.</p>  
 </body></html>  

In the very basic above example are the key parts to every web page. The first DOCType line describes what encoding the page uses. For most pages, unless they are using XML this line will work. Next, the HTML tag begins letting the browser know that HTML code is being used until it is terminated at the end of the page. Next, the head section contains header information about the page, which will almost always contain the title of the page and the meta tags. Finally, the body section is all content that is viewable on the browser. For example, all the text you see here is contained within the body tags.

HTML5 is the update made to HTML from HTML4 (XHTML follows a different version numbering scheme). It uses the same basic rules as HTML4, but adds some new tags and attributes which allow for better semantics and for dynamic elements that are activated using JavaScript. New elements include section, article, aside, header, hgroup, footer, nav, figure, figcaption, video, audio, track, embed (different usage), mark, progress, meter, time, ruby, rt, rp, bdi, wbr, canvas, command, details, datalist, keygen, and output. There are new input types for forms, which include tel, search, url, email, datetime, date, month, week, time, datetime-local, number, range, and color.
A number of elements have been removed due to being presentational elements, accessibility issues, or lack of use. These should no longer be used: basefont, big, center, font, strike, tt, frame, frameset, noframes, acronym, applet, isindex, and dir.

HTML5 also simplifies the doctype declaration. To declare a document as an HTML5 document, you only need the below tag for the doctype.

HTML Presentation :-

SHARE THIS POST

Author: Robin Saxena
I m computer science student and i Interested in cs, c/c++ programming, java, html ,Photography , Music , and generally connecting with others.

0 comments :

PHP (Hypertext Preprocessor)

php (Hypertext preprocessor)

PHP is a script language and interpreter that is freely available and used primarily on Linux Web servers. PHP, originally derived from Personal Home Page Tools, now stands for PHP: Hypertext Preprocessor, which the PHP FAQ describes as a "recursive acronym."

    PHP is an alternative to Microsoft's Active Server Page (ASP) technology. As with ASP, the PHP script is embedded within a Web page along with its HTML. Before the page is sent to a user that has requested it, the Web server calls PHP to interpret and perform the operations called for in the PHP script.

     An HTML page that includes a PHP script is typically given a file name suffix of ".php" ".php3," or ".phtml". Like ASP, PHP can be thought of as "dynamic HTML pages," since content will vary based on the results of interpreting the script.

PHP is free and offered under an open source license.

Example #1 An introductory example :-
 
 <!DOCTYPE HTML PUBLIC "-//W3C//DTD HTML 4.01 Transitional//EN"  
   "http://www.w3.org/TR/html4/loose.dtd">  
 <html>  
   <head>  
     <title>Example</title>  
   </head>  
   <body>  
     <?php  
       echo "Hi, I'm a PHP script!";  
     ?>  
   </body>  
 </html>  

PHP Presentation :-


SHARE THIS POST

Author: Robin Saxena
I m computer science student and i Interested in cs, c/c++ programming, java, html ,Photography , Music , and generally connecting with others.

1 comments :

What is Android


Operating Systems have developed a lot in last 15 years. Starting from black and white phones to recent smart phones or mini computers, mobile OS has come far away. Especially for smart phones, Mobile OS has greatly evolved from Palm OS in 1996 to Windows pocket PC in 2000 then to Blackberry OS and Android.
       One of the most widely used mobile OS these days is ANDROID. Android is a software bunch comprising not only operating system but also middleware and key applications. Android Inc was founded in Palo Alto of California, U.S. by Andy Rubin, Rich miner, Nick sears and Chris White in 2003. Later Android Inc. was acquired by Google in 2005. After original release there have been number of updates in the original version of Android.


Features & Specifications

Android is a powerful Operating System supporting a large number of applications in Smart Phones. These applications make life more comfortable and advanced for the users. Hardware that support Android are mainly based on ARM architecture platform. Some of the current features and specifications of android are:

Android comes with an Android market which is an online software store. It was developed by Google. It allows Android users to select, and download applications developed by third party developers and use them. There are around 2.0 lack+ games, application and widgets available on the market for users.
    Android applications are written in java programming language. Android is available as open source for developers to develop applications which can be further used for selling in android market. There are around 200000 applications developed for android with over 3 billion+ downloads. Android relies on Linux version 2.6 for core system services such as security, memory management, process management, network stack, and driver model. For software development, Android provides Android SDK (Software development kit). Read more about open source software. 

Applications

These are the basics of Android applications:
•      Android applications are composed of one or more application components (activities, services, content providers, and broadcast receivers)
•      Each component performs a different role in the overall application behavior, and each one can be activated individually (even by other applications)
•      The manifest file must declare all components in the application and should also declare all application requirements, such as the minimum version of Android required and any hardware configurations required
•      Non-code application resources (images, strings, layout files, etc.) should include alternatives for different device configurations (such as different strings for different languages)
Google, for software development and application development, had launched two competitions ADC1 and ADC2 for the most innovative applications for Android. It offered prizes of USD 10 million combined in ADC1 and 2. ADC1 was launched in January 2008 and ADC 2 was launched in May 2009. These competitions helped Google a lot in making Android better, more user friendly, advanced and interactive.

Android  Presentation:-


Android updates

Google is constantly working on new versions of the Android software. These releases are infrequent; at the moment they normally come out every six months or so, but Google is looking to slow this down to once a year.
Versions usually come with a numerical code and a name that’s so far been themed after sweets and desserts, running in alphabetical order.
  • Android 1.5 Cupcake
  • Android 1.6 Donut
  • Android 2.1 Eclair
  • Android 2.2 Froyo
  • Android 2.3 Gingerbread
  • Android 3.2 Honeycomb - The first OS design specifically for a tablet, launching on the Motorola Xoom
  • Android 4.0 Ice Cream Sandwich: The first OS to run on smartphones and tablet, ending the 2.X naming convention.
  • Android 4.1 Jelly Bean: Launched on the Google Nexus 7 tablet by Asus
  • Android 4.2 Jelly Bean: Arrived on the LG Nexus 4
  • Android 4.3 Jelly Bean
  • Android 4.4 KitKat: Launched on the LG Nexus 5


Android & Android Phone Presentation :-


SHARE THIS POST

Author: Robin Saxena
I m computer science student and i Interested in cs, c/c++ programming, java, html ,Photography , Music , and generally connecting with others.

1 comments :

Application programmaing Interface (API)

Java API is not but a set of classes and interfaces that comes with the JDK. Java API is actually a huge collection of library routines that performs basic programming tasks such as looping, displaying GUI form etc. In the Java API classes and interfaces are packaged in packages. All these classes are written in Java programming language and runs on the JVM. Java classes are platform independent but JVM is not platform independent. You will find different downloads for each OS.

Java Collections API - Presentation:


SHARE THIS POST

Author: Robin Saxena
I m computer science student and i Interested in cs, c/c++ programming, java, html ,Photography , Music , and generally connecting with others.

Java Environment

JDK contains tools that are required to build and execute Java applications and applets. JDK can be freely downloaded from the sun's website.
  • javac _Java Compiler
The Java source code will be compiled by this compiler, which checks for the syntax of the program and will list out errors if any, or will generate the byte code. The Java compiler generate the .class file (byte code).
  • java –Java interpreter
Java interpreter reads the .class file of the application programs that contains the byte code and executes the code in a local machine.
  • appletviewer
The applet viewer runs the Java applets
  • javadoc_ Java Documentation
 Document generator that can be used to create documents for large source codes.
  • javah_ C header
 Produces header files that are used for writing native methods.
  • javap_ Disassembler
Helps to convert byte code into program description.
  • jdb-Debugger
 Helps to find errors in our program.

For free JDK download visit :-


New Features Of JDK 7 - Presentation: 


SHARE THIS POST

Author: Robin Saxena
I m computer science student and i Interested in cs, c/c++ programming, java, html ,Photography , Music , and generally connecting with others.

Features of Java

  • Simple, Small and familiar
  • Compiled and interpreted
  • Platform independent and portable
  • Pure Object_Oriented
  • Distributed
  • Robust
  • Secure
  • High Performance
  • Multithreaded and Interactive
  • Dynamic and Extensible
 Platform Independent:
  • The concept of Write-once-run-anywhere (known as the Platform independent) is one of the important key feature of java language that makes java as the most powerful language. Not even a single language is idle to this feature but java is more closer to this feature.
  • The programs written on one platform can run on any platform provided the platform must have the JVM.
Simple, Small and Familier:
  • There are various features that makes the java as a simple language. Programs are easy to write and debug because java does not use the pointers explicitly.
  • It is much harder to write the java programs that can crash the system but we can not say about the other programming languages.
  • Java provides the bug free system due to the strong memory management. It also has the automatic memory allocation and deallocation system.
Object Oriented:
      To be an Object Oriented language, any language must follow at least the four characteristics.
   Inheritance         
          It is the process of creating the new classes and using the behavior of the existing classes by   extending
          them  just to  reuse  the existing code and adding the additional features as needed. 
   Encapsulation         
          It is the mechanism of combining the information and providing the abstraction.
   Polymorphism          
          As the name suggest one name multiple form, Polymorphism is the way of providing the different       
          functionality by the  functions  having the same name based on the signatures of the methods.
     Dynamic binding  
          Sometimes we don't have the knowledge of objects about their specific types  while writing our code. It is    
          the way  of providing the maximum functionality to a program about the specific type at runtime. 
  • As the languages like Objective C, C++ fulfills the above four characteristics yet they  are not fully object oriented languages because they are structured as well as object oriented languages.
  • But in case of java,  it is a fully Object Oriented language because object is at the outer most level of data structure in java. No stand alone methods, constants, and variables are there in java. Everything in java is object even the primitive data types can also be converted into object by using the wrapper class.
Robust:
  • Java has the strong memory allocation and automatic garbage collection mechanism. It provides the powerful exception handling and type checking mechanism as compare to other programming languages.
  • Compiler checks the program whether there any error and interpreter checks any run time error and makes the system secure from crash. All of the above features makes the java language robust.
Distributed:
  • The widely used protocols like HTTP and FTP are developed in java. Internet programmers can call functions on these protocols and can get access the files from any remote machine on the internet rather than writing codes on their local system.
Portable:
  • The feature Write-once-run-anywhere  makes the java language portable provided that the system must have interpreter for the JVM.
  • Java also have the standard data size irrespective of operating system or the processor. These features makes the java as a portable language.
Dynamic:
  • While executing the java program the user can get the required files dynamically from a local drive or from a computer thousands of miles away from the user just by connecting with the Internet.
Secure:
  • Java does not use memory pointers explicitly. All the programs in java are run under an area known as the sand box. Security manager determines the accessibility options of a class like reading and writing a file to the local disk.         
  • Java uses the public key encryption system to allow the java applications to transmit over the internet in the secure encrypted form. The bytecode Verifier checks the classes after loading.
Performance:
  • Java uses native code usage, and lightweight process called  threads. In the beginning interpretation of bytecode resulted the performance slow but the advance version of JVM uses the adaptive and just in time compilation technique that improves the performance.
Multithreaded:
  • As we all know several features of Java like Secure, Robust, Portable, dynamic etc; you will be more delighted to know another feature of Java which is Multithreaded.
  • Java is also a Multithreaded programming language. Multithreading means a single program having different threads executing independently at the same time.
  • Multiple threads execute instructions according to the program code in a process or a program. Multithreading works the similar way as multiple processes run on one computer.  
  • Multithreading programming is a very interesting concept in Java. In multithreaded programs not even a single thread disturbs the execution of other thread.
  • Threads are obtained from the pool of available ready to run threads and they run on the system CPUs. This is how Multithreading works in Java which you will soon come to know in details in later chapters.
Interpreted:
  • We all know that Java is an interpreted language as well. With an interpreted language such as Java, programs run directly from the source code. 
  • The interpreter program reads the source code and translates it on the fly into computations. Thus, Java as an interpreted language depends on an interpreter program.
  • The versatility of being platform independent makes Java to outshine from other languages. The source code to be written and distributed is platform independent. 
  • Another advantage of Java as an interpreted language is its error debugging quality. Due to this any error occurring in the program gets traced. This is how it is different to work with Java.

SHARE THIS POST

Author: Robin Saxena
I m computer science student and i Interested in cs, c/c++ programming, java, html ,Photography , Music , and generally connecting with others.